
|
The Configure LDAP Dialog |
| Prev | KAddressBook Advanced Features Reference Section | Next |
Here is a picture of the first configuration screen that appears when you choose either the
button in the →
→
dialog or the →
 Configure KAddressBook... menu item.

If you have already configured one or more LDAP servers, use this screen to select the servers
that should be queried when you search for a name or email address. Use the button
to add a new server to the list of available LDAP hosts. Use the
button to reconfigure a server that's already on the list, and the button to
delete an entry you don't need any more. The  Reset button can be used to undo the last "Add" or "Remove" action performed. The "Defaults" button is inoperative
in release 5.10.3. The rest of the buttons (OK, Apply, Cancel) have their ordinary functions: apply changes and exit, apply changes
and stay here, and exit the dialog without making any changes, respectively.
Reset button can be used to undo the last "Add" or "Remove" action performed. The "Defaults" button is inoperative
in release 5.10.3. The rest of the buttons (OK, Apply, Cancel) have their ordinary functions: apply changes and exit, apply changes
and stay here, and exit the dialog without making any changes, respectively.
When you choose either the button or the button, the following dialog will appear.
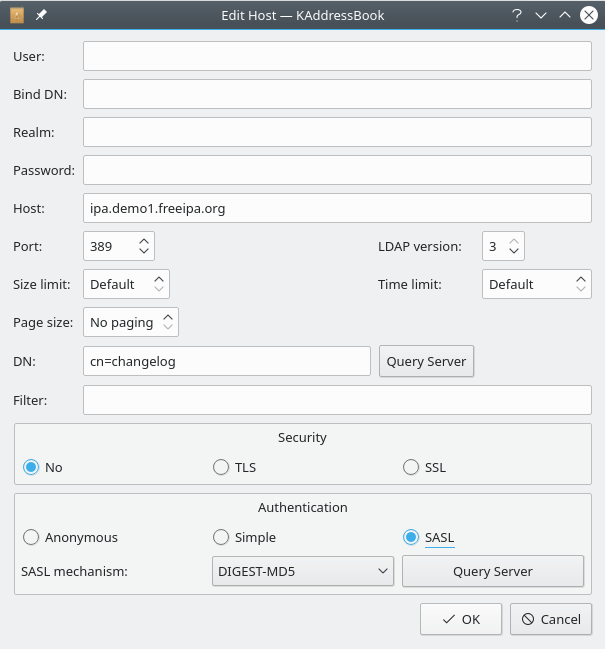
The first four fields ("User:", "Bind DN:", "Realm:", and "Password:") will all be grayed out unless authentication is required. Obtain these credentials from the LDAP server's administrator. Enter the appropriate URI in the "Host:" field. The default values for "Port:", "Size limit:", etc. will work OK for most users. You can use the button to set up the "DN:" field. I have no idea what the "Filter:" field is for. If you figure it out, please let me know (davidbryant AT gvtc.com).
Use the "Security" section to specify the encryption method to use: "No: for an unencrypted connection, TLS for Transport Layer Security, or SSL for Secure Socket Layer. Use the "Authentication" options to specify what level of authentication the server requires: "Anonymous" for no name or password at all, "Simple" if "Bind DN" and "Password" must be given, and SASL (Simple Authentication and Security Layer) for the whole schmear (four data items). If "SASL" is chosen, use the button to set the advanced options for this host.
Click here to return to the Table of Contents for this Appendix.
| Prev | Contents | Next |
| The Print-Preview Dialog | Up | The Import CSV File Function |